Friday, July 17, 2015

How To Configure SSH for a RAC Installation (Doc ID 300548.1)

To configure SSH you need to perform the following steps on each node in the cluster.

$ cd $HOME
$ mkdir .ssh
$ chmod 700 .ssh
$ cd .ssh
$ ssh-keygen -t rsa


Now accept the default location for the key file
Enter and confirm a passphrase. (you can also press enter twice).


$ ssh-keygen -t dsa

Now accept the default location for the key file
Enter and confirm a passphrase. (you can also press enter twice).


$ cat *.pub >> authorized_keys.<nodeX> (nodeX could be the nodename to differentiate files later)

Now do the same steps on the other nodes in the cluster.
When all those steps are done on the other nodes, start to copy the authorized_keys.<nodeX> to all the nodes into $HOME/.ssh/


For example if you have 4 nodes you will have after the copy in the .ssh 4 files with the name authorized_keys.<nodeX>

Then on EACH node continue the configuration of SSH by doing the following:

$ cd $HOME/.ssh
$ cat *.node* >> authorized_keys
$ chmod 600 authorized_keys


NOTE: ALL public keys must appear in ALL authorized_keys files, INCLUDING the LOCAL public key for each node.

To test that everything is working correct now execute the commands

$ ssh <hostnameX> date

So on example in a 4 node environment:
$ ssh node1 date
$ ssh node2 date
$ ssh node3 date
$ ssh node4 date


Repeat this 4 times on each node, including ssh back to the node itself. The nodeX is the hostname of the node.

The first time you will be asked to add the node to a file called 'known_hosts' this is correct and answer the question with 'yes'. After that when correctly configured you must be able to get the date returned and you will not be prompted for a password.

Note: the above will work if during RSA and DSA configuration no password was provided. If you provide a password then you need to do 2 addition steps.

$ exec /usr/bin/ssh-agent $SHELL
$ /usr/bin/ssh-add


These statements will inform the ssh agent to add the keys to the shell used. So when a new shell is started you need to repeat the last to statements to make sure ssh is working properly.

Please note, ssh will not allow passwordless access if permissions on the home directory of the account you are using allow write access for everyone.

You will also see permission denied error when the permissions on $HOME are 777 or 775. $HOME should have permission 700 or 755.

How To Download And Install The Latest OPatch Version (Doc ID 274526.1)

1) Please download the latest OPatch version from My Oracle Support (MOS) using the next reference:

Patch 6880880

Or using the next URL:
https://updates.oracle.com/download/6880880.html

2) In the "Platform" field select the relevant platform that corresponds to the Oracle product.

3) Click the Download button


2) Upload the opatch.zip file to your OS host and unzip it:
Example:

% mv p6880880_101000_SOLARIS64.zip $ORACLE_HOME
% cd $ORACLE_HOME
(If a former OPatch directory already exist, then rename it)
% mv Opatch OPatch_100057_OLD
% unzip p6880880_101000_SOLARIS64.zip
Archive: p6880880_101000_SOLARIS64.zip
creating: OPatch/
creating: OPatch/docs/
inflating: OPatch/docs/FAQ
inflating: OPatch/docs/README.txt
inflating: OPatch/docs/Users_Guide.txt
inflating: OPatch/docs/bt1.txt
inflating: OPatch/docs/bt2.txt
inflating: OPatch/docs/tmp
inflating: OPatch/emdpatch.pl
creating: OPatch/jlib/
inflating: OPatch/jlib/opatch.jar
inflating: OPatch/opatch
inflating: OPatch/opatch.bat
inflating: OPatch/opatch.pl
creating: OPatch/perl_modules/
inflating: OPatch/perl_modules/Apply.pm
inflating: OPatch/perl_modules/AttachHome.pm
inflating: OPatch/perl_modules/Command.pm
inflating: OPatch/perl_modules/LsInventory.pm
inflating: OPatch/perl_modules/Query.pm
inflating: OPatch/perl_modules/RollBack.pm
inflating: OPatch/perl_modules/Version.pm
inflating: OPatch/perl_modules/XML.pm
inflating: OPatch/perl_modules/opatchIO.pm
inflating: OPatch/README.txt
creating: OPatch/ocm/
extracting: OPatch/ocm/ocm.zip
creating: OPatch/ocm/doc/
inflating: OPatch/ocm/doc/license.txt
creating: OPatch/ocm/lib/
inflating: OPatch/ocm/lib/emocmutl.jar
creating: OPatch/ocm/bin/
inflating: OPatch/ocm/bin/emocmrsp

% cd OPatch
% opatch version

Oracle Interim Patch Installer version 1.0.0.0.58
Copyright (c) 2007 Oracle Corporation. All Rights Reserved..

We recommend you refer to the OPatch documentation under
OPatch/docs for usage reference. We also recommend using
the latest OPatch version. For the latest OPatch version
and other support related issues, please refer to document
293369.1 which is viewable from metalink.oracle.com

OPatch Version: 1.0.0.0.58

3)You can launch OPatch tool by using the absolute path :

ex.:

$ORACLE_HOME/OPatch/opatch version

Or you can set the OPatch directory in your PATH variable so you can execute the OPatch command (opatch <args>) from anywhere without using the absolute path.
ex.:

For Korn / Bourne shell:

% export PATH=$PATH:$ORACLE_HOME/OPatch

For C Shell:
% setenv PATH $PATH:$ORACLE_HOME/OPatch

How to Add a RAC Node to an Oracle Cluster

A. Verify Prequisites:

Check System Hardware requirements; make sure it is matching with existing nodes (Recommended).

RAM size (Min 2.5 GB, to match with other nodes 36 GB):
/usr/sbin/lsattr -E -l sys0 -a realmem


Swap Space (Min 16 GB, to match with other nodes 24 GB):
/usr/sbin/lsps –s


Temp directory space (Min 1GB, to match with other nodes 4GB):
/usr/bin/df -k /tmp


Compare the size of /u01 mount point with existing nodes to match the size of software installation location
df –g

1. Create Groups and users:
Make sure the following User and Groups exists.
User: Oracle Groups: Oinstall, DBA


Run the below command in racattack18u:
$id oracle
If they don’t exist than create them.
$mkgroup id=’267’ adms='root' oinstall
$ mkgroup id=’264’ adms='root' dba
$ mkuser id=’501’  pgrp='oinstall' groups='dba' home='/u01' oracle


Id’s matching with current production id’s.

2. Create required Directories
ORACLE_BASE
mkdir –p /u01/app/oracle
chown oracle:oinstall /u01/app/oracle
chmod –R 775 /u01/app/oracle

ORACLE_HOME
mkdir –p /u01/products/rdbms_11203
chown oracle:oinstall /u01/products/rdbms_11203
chmod –R 775 /u01/products/rdbms_11203

GRID_HOME
mkdir –p /u01/products/grid_11203
chown root:oinstall /u01/products/grid_11203
chmod –R 775 /u01/products/grid_11203


3. UDP and TCP Kernal Parameters:
Contact AIX team and request them to verify if the kernel parameters are setup as recommended by Oracle.

http://docs.oracle.com/cd/E11882_01/install.112/e48294/preaix.htm#CWAIX418

4. Check the network requirements
Contact Network team and request to setup the network as recommended by Oracle for cluster environment.

http://docs.oracle.com/cd/E11882_01/install.112/e48294/preaix.htm#CWAIX196

A Oracle database cluster node must have the below ip addresses:
Public ip address
Private ip address
Virtual ip address
Single client access name


Current configuration in racattack16u and racattack17u (Can be found in /etc/hosts file):

Public ip address:
10.10.10.148     racattack16u
10.10.10.150     racattack17u


Private id address:
10.10.10.71     racattack16u
10.10.10.72     racattack17u


Virtual ip address:
10.10.10.149  racora3.gmail.com   racora3 # ORA Virt. Address A
10.10.10.151  racora4.gmail.com   racora4 # ORA Virt. Address B


Scan IP address:
SCAN IP Addresses for RAC Cluster (addresses selected round robin in DNS):
# 10.10.10.147 \
# 10.10.10.54  } rac-scan
# 10.10.10.155 /


For Current production cluster setup the Single client access name is defined as “rac-scan”  , new node racattack18u should be included in it.

Once the configuration is done, run the below command to confirm.
$nslookup rac-scan
Output should be similar in all the 3 nodes.


Current output:oracle@racattack17u:rac2:/u01 $  nslookup rac-scan
Server:         10.10.10.37
Address:       10.10.10.53


Name:   rac-scan.li-sec.state.pa.us
Address: 10.10.10.155
Name:   rac-scan.li-sec.state.pa.us
Address: 10.10.10.154
Name:   rac-scan.li-sec.state.pa.us
Address: 10.10.10.147


5. Make sure that all the ASM disks can be accessed by the Oracle user on new node.

Contact Storage team and request them to present all the storage devices currently used by ASM on production cluster database to racattack18u, and set their ownership to oracle user.

Once done, DBA can verify the same using below steps:

On racattack16u:
$export ORACLE_SID=ASM
$ . oraenv
$sqlplus ‘/as sysasm’


Sql>select path from v$asm_disk;
/dev/asm_128G_P0_1
/dev/asm_128G_P0_2
/dev/asm_128G_P0_3
/dev/asm_128G_P10_1
/dev/asm_128G_P1_1
/dev/asm_128G_P1_2
/dev/asm_128G_P1_3
Total 39 disks available right now…..


Exit out of sqlplus,
$ls –ltr /dev/asm_*


Now connect to racattack18u and run the below command:
$ls –ltr /dev/asm_*


Make sure the result is same for “ls” command in racattack16u and racattack18u.

6. Configure ssh and set user equivalency, Make sure you are able to connect to oracle user of racattack16u, racattack17u from racattack18u using ssh without providing password.

As Oracle user Run the Below commands on racattack18u:
$ cd /u01/.ssh
$mv authorized_keys2 authorized_keys2.old


Now As Oracle user run the below Commands on racattack16u
$cd /u01/.ssh
$scp authorized_keys2
oracle@racattack18u: /u01/.ssh/
$ssh racattack18u 
(You should be able to connect without prompting a password)


NOTE: In case something is missed in prerequisites, it can be detected automatically when we run “cluvfy” utility in below steps. Which can be fixed subsequently.

B. Verify using Cluster verification utility for Node add procedure:

1. From an existing node(racattack16u) perform post hardware and OS check
$ cluvfy stage -post hwos -n racattack18u


2. From an existing node run the below command to Compare one of the existing node with new node
$ cluvfy comp peer -refnode racattack16u -n racattack18u -orainv oinstall -osdba dba –verbose


3. Run the below command to Verify the integrity of the cluster and the new node
$cluvfy stage –pre nodeadd –n racattack18u –verbose


We may receive PRVF-5449 Error, it’s an Oracle BUG, workaround is to set the below environment variable.

export IGNORE_PREADDNODE_CHECKS=Y

C. Add Grid Home to the new Node:

Run the below addnode.sh command from racattack16u to add new node to the cluster, this will run Oracle universal installer in silent mode and copy the Oracle Grid_Infrastructure binaries from existing node to new node.


$GRID_HOME/oui/bin/addnode.sh “CLUSTER_NEW_NODES=
{ racattack18u }” “CLUSTER_NEW_VIRTUAL_HOSTNAMES={ racora5}”


At the end of the script, it will prompt to run scripts as root user (in the new node racattack18u), connect to a new session with root user and run the scripts suggested. Once the root scripts are executed successfully, hit enter on the current screen to complete the GRID_HOME installation in new node.

If this is successful than we can see the new node as part of cluster and along with this it starts clusterware deamons, ASM instance, Listener, VIP, Scan services in the new node.

Run the below commands to verify,

$ps –ef|grep grid|grep –v grep (In New Node racattack18u)
$ps –ef|grep d.bin (In New Node racattack18u)
$crsctl check crs (In New Node racattack18u)
$crsctl stat res –t (From any node)
$olsnodes (From any node)


D. Add Oracle Home to the new Node:

Run the below addnode.sh command from racattack16u to add new node to the cluster, this will run Oracle universal installer in silent mode and copy the Oracle rdbms binaries from existing node to new node.

$ORACLE_HOME/oui/bin/addnode.sh “CLUSTER_NEW_NODES=
{ racattack18u }”


At the end of the script, it will prompt to run scripts as root user (in the new node racattack18u), connect to a new session with root user and run the scripts suggested. Hit enter on the current screen to complete the ORACLE_HOME installation in new node.

E. Add instance to the database for newly added node

Invoke DBCA from one of the old node and add new instance to the database.
RAC database-->Instance management-->Add Instance


Do this process for all the databases running under the cluster. 

F. Verification of Node addition:

Run the below commands from one of the node racattack16u to confirm the new node and instance are added successfully.

$ cluvfy stage –post nodeadd –n racattack18u -verbose
$ olsnodes
$ crsctl stat res –t
        
Connect to the new node racattack18u and run the below commands to check the details of newly added node.

$ crsctl check crs  
$ ps –ef|grep d.bin
$ ps –ef|grep pmon

Go through the directories of ORACLE_HOME, ORACLE_BASE and GRID_HOME.

Connect to Oracle database instance using sqlplus.
Connect to the ASM instance using asmcmd and sqlplus.


How to remove a RAC node from and Cluster

The following steps the are required to successfully remove a Cluster Node from an existing Cluster:

1) Before starting the node removal process it is always recommended to take backup of OCR and databases.
-Login as root on racattack15u and verify the last backup of OCR
#$GRID_HOME/bin/ocrconfig -showbackup
-If required take a manual backup of OCR
#$GRID_HOME/bin/ocrconfig –manualbackup


2) Unpin the node to be removed if it is pinned
Run the below command from one of the node to check if the node to be removed is pinned or unpinned.
$ olsnodes -t -s 
racattack15u   Active  Unpinned
racattack18u   Active  Unpinned
(NOTE: Verified they are already unpinned)

-Run the below command if racattack18u is pinned
$crsctl unpin css -n racattack18u


3) Remove the database instance using DBCA
Note: This can also be done using a AIX GUI interface like CYGWIN.
Remove the database instance using DBCA:
-Invoke DBCA from racattack15u as oracle user
$$ORACLE_HOME/bin/dbca
Select the following in each screen to remove all the database instances  running in racattack18u
RAC database-->Instance management-->Delete Instance

Repeat to remove all the 3 Instances.

4) Verify the instance has been removed with the following commands on racattack18u.
$srvctl config database -d racdb1
$srvctl config database -d racdb2
$srvctl config database -d racdb3
$ps –ef|grep pmon
$crsctl stat res -t

NOTE: At this point database instances and its related services are removed from cluster. ASM and other clusterware compontents will be removed as part of GRID infrastructure removal.

5) Disable and Stop Listener on the Node to be removed.
oracle@racattack18u::/u01 $ ps -ef|grep tns (To get the running listener_alias name)oracle@racattack18u::/u01 $ lsnrctl status <Listener Alias>oracle@racattack18u::/u01 $ srvctl config listener -a
-Use the below commands to disable the listener(s) which are running from ORACLE_HOME
oracle@racattack18u::/u01 $ srvctl disable listener -l <Listener Name> -n racattack18uoracle@racattack18u::/u01 $ srvctl stop listener -l <Listener Name> -n racattack18u

6) Update Inventory on the Node to be deleted
-Verify the inventory in racattack18u before updating it.
$ cat /u01/app/oraInventory/ContentsXML/inventory.xml

-Run the following command on racattack18u to update the inventory
$ /u01/products/rdbms_11203/oui/bin/runInstaller -updateNodeList ORACLE_HOME=/u01/products/rdbms_11203 "CLUSTER_NODES={racattack18u}" -local

-Verify the inventory in racattack18u it should not have information about racattack15u
$ cat /u01/app/oraInventory/ContentsXML/inventory.xml


7.) Remove the  RAC Database Software
The next step is to remove the RAC Database Software from the node to be deleted (racattack18u).
-Run below command as oracle user from racattack18u
$ cd $ORACLE_HOME/deinstall
$ ./deinstall -local
(-local option is to remoce ORACLE_HOME from local node)


8.) Update Inventory on the Remaining Nodes
-Verify the inventory in racattack15u before updating it.
$ cat /u01/app/oraInventory/ContentsXML/inventory.xml

-Run the following command on racattack15u to update the inventory
$ cd /u01/products/rdbms_11203/oui/bin
$ runInstaller -updateNodeList ORACLE_HOME=/u01/products/rdbms_11203 "CLUSTER_NODES={racattack15u}" -local

-Verify the inventory in racattack15u it should not have information about racattack18u
$ cat /u01/app/oraInventory/ContentsXML/inventory.xml


9.) Remove Clusterware
The next step is to remove the clusterware from the node you want to delete.
Note: This must do as root.

-As root on racattack18u run the below command to deconfig clusterware
# cd /u01/products/grid_11203
# pwd
/u01/products/grid_11203
# cd crs/install
# pwd
/u01/products/grid_11203/crs/install
# hostname
racattack18u
# ./rootcrs.pl -deconfig -force

(At this point All the clusterware services including ASM are stopped)

10.) Delete node from Clusterware configuration
The next step is to remove the desired node from the clusterware configuration.  This is done with the following commands.
# cd /u01/products/grid_11203/bin
# olsnodes –t –s (For verification)
-As root on racattack15u run the below command to delete racattack18u from cluster
# crsctl delete node -n racattack18u
(racattack18u will be removed from clusterware and registry)
-Run the below command from racattack15u to verify the existing nodes
# olsnodes –t –s (For verification)
(Should only show racattack15u)


11.) Update Inventory on node to be removed as "Grid"
The next step is to update the inventory on the desired node to be removed as the "Grid" software owner (Oracle for this environment).
Note:  make sure that is done as the "Grid Owner" which is "Oracle" in this environment.

Verify the inventory in racattack18u
$ cat /u01/app/oraInventory/ContentsXML/inventory.xml

-Run the following command on racattack18u to update the inventory
$ cd /u01/products/grid_11203/oui/bin
$ runInstaller -updateNodeList ORACLE_HOME=/u01/products/grid_11203 "CLUSTER_NODES={racattack18u}" -local

-Verify the inventory in racattack18u it should not have information about racattack15u
$ cat /u01/app/oraInventory/ContentsXML/inventory.xml


12.) Remove the Clusterware Software from node to be removed.
The next step is to remove the clusterware software from the desired node (racattack18u). 
Note:  make sure that is done as the "Grid Owner". which is "Oracle" in this environment.

-Run below command as oracle user from racattack18u
$ cd /u01/products/grid_11203/deinstall
$ ./deinstall -local
(-local option is to remoce ORACLE_HOME from local node)
-In the end it asks us to run a script from a different session as root, run the script


13.) Update Inventory on remaining nodes for "Grid"
The next step is to update inventory on the remaining nodes (racattack15u) for "Grid". 
Note:  make sure that is done as the "Grid Owner"

Verify the inventory in racattack15u
$ cat /u01/app/oraInventory/ContentsXML/inventory.xml

- Run the following command on racattack15u to update the inventory
$ cd /u01/products/grid_11203/oui/bin
$ ./runInstaller -updateNodeList ORACLE_HOME=/u01/products/grid_11203 "CLUSTER_NODES={racattack15u}"

-Verify the inventory in racattack15u it should not have information about racattack18u
$ cat /u01/app/oraInventory/ContentsXML/inventory.xml


14.) Confirm the node has been successfully removed.
The next step is to verify that the node has been successfully removed.  To do this, execute the following command.
-Run the below command from racattack15u as oracle useroracle@racattack15u:racdb1:/u01 $ cluvfy stage -post nodedel -n racattack18uoracle@racattack15u:racdb1:/u01 $ crsctl stat res -t
NOTE: At this Stage racattack18u is clean without any Oracle software installations. racattack15u still remains as a single instance cluster database.

Saturday, July 4, 2015

How to set the diagwait parameter

Following is the action plan to set the diagwait parameter:


1)  Stop database and other services across all the nodes
    
     $srvctl stop database -d <db_name>
     $srvctl stop asm -n node1
     $srvctl stop asm -n node2
     $srvctl stop nodeapps -n node1
     $srvctl stop nodeapps -n node2
2)  Stop the cluster on all the nodes
    
     As root:
     #crsctl stop crs
     #<CRS_HOME>/bin/oprocd stop

3)  Ensure that Clusterware stack is down on all nodes by executing
    
     #ps -ef |egrep "crsd.bin|ocssd.bin|evmd.bin|oprocd"

4)  From one of the node set the diagwait
    
     As root:
     #crsctl set css diagwait 13 -force

5)  Check if diagwait is set successfully by executing, the following command.
    
     #crsctl get css diagwait

6)  Start cluster on all the nodes
    
     As root:
     #crsctl start crs

7)  Check the status of cluster
    
     crsctl check crs

8)  Validate the status of all the services
    
     crsstat.ksh

Steps to Configure VirtualBox Shared Folders in Ubuntu 10.10 Guest with Windows 7

1) Read this article and install VB guest additions.

2) Go to ‘Shared Folders’ option under virtual machine’s settings. Browse the Windows 7 folder or partition you want to share with Ubuntu 10.10.
Note: Any network between both Operating Systems not required.
Note down the Share Name. ‘Make Permanent’ option if you want all the time.
3) Guest OS will detect this share if guest additions installed and started properly. We have to mount this share inside Ubuntu guest. To do it, create a folder on any location.
I’m creating a folder inside media folder called ‘ windows7share’
sudo mkdir windows7share
4) Now we have to mount the VirtualBox shared folder to above folder with following command.
sudo mount -t vboxsf H_DRIVE /media/windows7share

5)
 That’s it. It should work without any issues.  I could see the all folders and files from particular Windows 7 partition. Creating files and folders from Ubuntu guest worked well and I can see them from Windows 7 too, because ‘Read Only’ option was not selected.
6) Once you restart this virtual machine, the above mount will disappear. To make this mount and virtualbox shared folder access permanent,
a) Make sure to select ‘ Make Permanent’ option in step 2.
b) Add the command used in Step 4 to  /etc/init.d/rc.local file, to run the command every time when systemstarts up.

Configure the VirtualBox Network

In “Create Your Own Test System” I made the case that there is no excuse for someone who considers themselves to be a professional DBA to NOT have their own personal database for testing and learning. I pointed out that by using VMware’s VMplayer, Oracle Linux, and Oracle database under the terms of the developer license agreement, one could create their own private test system legally and at no cost.

I should note that VMware actually has two products that can be used for this purpose. VMplayer is distributed freely, and VMworkstation which costs US$249 as of this writing. (Note: I was rather shocked just now when I checked the current price. When I wrote my original post on the subject, the cost was only US$185.) The difference is that VMplayer is a very bare-bones product, while VMworkstation comes with a very nice management console, full support for snaphsot management, and flexible network management. The actual virtualization engine is the same across the entire range of VMware products, including their enterprise data center products.
In recent months the use of VirtualBox as the virtualization software has come into more prominence in the Oracle community. In comparison to VMware’s products, VirtualBox is much more like Vmworkstation in that it includes a management console for management of the overall virtual environment, vm snapshot management, etc. It should also be noted that VirtualBox appears to be intended as a virtualization product for the desktop. I do not see it as an enterprise solution for the datacenter.
When I first started working with VirtuaBox the first problem I ran into was dealing with the network configuration and it is at this point that I see a recent uptick in questions discussed on OTN.
I am not a networking expert and it is not my intent in this posting to give a detailed comparison between the way it is handled in VMware vs. VirtualBox. Rather, I simply want to lay out what I discovered I needed to do to get my virtual servers running under VirtualBox to network according to my requirements.

Terminology used in this post

Before continuing, let me define some of the acronyms and abbreviations I will be using.
VM – when I use the term “vm” I am simply using it as an abbreviation for the term “virtual machine”. I do not use it to refer to any product of the VMware corporation, or the VMware corporation itself. When referring to these entities, I will always use the actual product or company name – VMplayer, Vmworkstation, VMware. Also, I use the term ‘vms’ as the plural of ‘vm’. This is not to be confused with Digital Equipement Corporation’s ‘vms’ operating system. A lot of people would avoid this amgiguity by using “vm’s” as the plural of “vm”, but I was too well schooled in English grammer to use a possessive as a plural.
VBox – I use the term VBox to refer to VirtualBox. It is quite common on Vbox message boards to refer to it as simply VB. That is fine within the context of those forums, but in a broader sense I fear it may be confused with Microsoft’s Visual Basic product which is also widely referred to as “VB”.

My requirements

When I create a vm on my desktop, have four fundamental, non-negotiable requirements:
  • I must be able to work with, access, and manage the vm exactly as I would any real server in my data center. That means it has to be accessible from my desktop OS using exactly the same tools I use with my live database servers: putty for my ssh client, sqlplus, and any GUI database access tool like Toad, SQL-Navigator, SQL Developer, etc.
  • The vm must be able to access the internet to download OS packages from Oracle’s public yum server.
  • The vm must have a fixed IP address. You really can’t run a server (and that’s what this vm is) with a DHCP address.
  • The vm must be invisible to my network administrators. It cannot occupy an IP address on my company’s or ISP’s network. The “network nazis” must never know it’s there.

Network Modes

Let me digress for a moment to explain the different network modes in use with a virtualization product.

NAT (Network Address Translation)

With NAT, the guest (virtual) os has it’s own IP address, but communicates to the outside world thorough the host OS’s ip address. Requests are translated from the guest IP address to the host’s address before the host passes the request on. Messages received back are translated back to the guest OS’s ip address for the final leg of the trip. Honestly, I studied the details once, but have since forgotten them.

Bridged

Using a bridged adapter, the vm has an ip address that actually occupies a space on the host’s network. As such it communicates with the network under its own credentials and is visible (and controllable) by the network administrators.

Host Only

With a host only adapter, the vm can communicate only with the host OS or other vm’s running on the same hostonly adapter.

Setup the Virtual Machine

With VMware, meeting my four requirements was so simple I really just took it for granted and never gave it a thought. When you install VMware on your desktop two network adapters are created. VMnet1 is configured for ‘hostonly’ connections. VMnet8 is configured for NAT. I knew that I wanted to hide behind NAT, so gave my first vm an IP address in the subnet controlled by VMNet8 and everything “just worked”.  I never gave it another though.
When I started to use VB I immediately ran into problems.  After a lot of trial and error and, um, “animated” discussions on the VB user’s forum, I found that the VB implemented it’s networking entirely differently than VMware, and that impacted how the different configurations like NAT behaved.
So, without further ado, let’s get into how I set up my virtual machines running under Vbox. I am running VirtualBox on a Windows 7 Home Premium laptop, 64-bit.

Install VirtualBox

The installation of Vbox itself will create a network adapter on the host os. This can be seen by opening a command prompt and executing the ‘ipconfig’ command:
1
2
3
4
5
6
7
8
9
10
11
12
13
14
15
16
17
18
19
20
21
22
23
24
25
26
27
28
29
30
31
32
33
34
35
36
37
38
39
40
41
42
43
44
45
46
47
48
Microsoft Windows [Version 6.1.7601]
Copyright (c) 2009 Microsoft Corporation.  All rights reserved.
 
C:\Users\ed>ipconfig
 
Windows IP Configuration
 
Wireless LAN adapter Wireless Network Connection:
 
   Connection-specific DNS Suffix  . : ****.**.comcast.net.
   Link-local IPv6 Address . . . . . : ****::****:****:5fc8:e17c%12
   IPv4 Address. . . . . . . . . . . : 192.168.1.***
   Subnet Mask . . . . . . . . . . . : 255.255.255.0
   Default Gateway . . . . . . . . . : 192.168.1.1
 
Ethernet adapter Local Area Connection:
 
   Media State . . . . . . . . . . . : Media disconnected
   Connection-specific DNS Suffix  . :
 
Ethernet adapter VirtualBox Host-Only Network:
 
   Connection-specific DNS Suffix  . :
   Link-local IPv6 Address . . . . . : fe80::300a:4cfd:f300:133d%23
   IPv4 Address. . . . . . . . . . . : 192.168.56.1
   Subnet Mask . . . . . . . . . . . : 255.255.255.0
   Default Gateway . . . . . . . . . :
 
Ethernet adapter VMware Network Adapter VMnet1:
 
   Connection-specific DNS Suffix  . :
   Link-local IPv6 Address . . . . . : fe80::3538:74ea:6db:e40d%26
   IPv4 Address. . . . . . . . . . . : 192.168.236.1
   Subnet Mask . . . . . . . . . . . : 255.255.255.0
   Default Gateway . . . . . . . . . :
 
Ethernet adapter VMware Network Adapter VMnet8:
 
   Connection-specific DNS Suffix  . :
   Link-local IPv6 Address . . . . . : fe80::d144:2412:3a94:53da%28
   IPv4 Address. . . . . . . . . . . : 192.168.111.1
   Subnet Mask . . . . . . . . . . . : 255.255.255.0
   Default Gateway . . . . . . . . . :
 
Tunnel adapter isatap.{D3A1FFA7-BF1E-4938-B01A-B8DFE49B3F7F}:
 
   Media State . . . . . . . . . . . : Media disconnected
   Connection-specific DNS Suffix  . :
Reading this from the top down, we see the following
Line 8 , “ Connection-specific DNS Suffix” lists the information assisgned to the host OS (Windows 7) by the network to which it is currently connected. This is a DHCP assigned address and at the time of this snapshot, my primary connection was to my ISP. (key details are masked with asterisks.
Line 21. “Ethernet adapter VirtualBox Host-Only Network:”. This is the adapter created by the installation of Vbox. Please note the Ipv4 address of 192.168.56.1. at line 25. This will be important later on.
Line 29. “Ethernet adapter VMware Network Adapter Vmnet1:” This is the hostonly adapter created by the installation of Vmworkstation. I still have it installed on my laptop and have vm’s running under it was well as Vbox.
Line 37. “Ethernet adapter VMware Network Adapter Vmnet8”. This is the NAT adapter created by the installation of Vmworkstation.
I will leave the details of exactly how these adapters function to people who are more qualified than I. As explained to me, I simply think of them as being the routers to which my vms are connected. The adapter associated with NAT also acts as a DHCP server, assigning ip addresses to any NIC that is so configured.

Creating the virtual machine

At this point, we have simply installed the Vbox product. Doing so has also create the network environment in which our vms will operate. They will all exist on the same subnet as our Ethernet adapter VirtualBox Host-Only Network – that is 192.168.56.
Now comes the ‘tricky’ part. As mentioned above, with VMware I simply configured my vm with a fixed ip in the same subnet as my NAT adapter – the Vmnet8 adapter, at 192.168.111.1. What I found with Vbox was that the NAT configuration requires a DHCP address. The solution to my four fundamental requirements was to create my vm with two virtual Network Interface Cards (NIC). The first would be configured for DHCP for NAT connections, the second with a fixed IP for hostonly connections. Here’s how I did it.
In this example, I have just created a new virtual machine, named ‘vblnxsrv99′. I have not yet installed and operating system. We can think of ‘vblnxsrv99′ as a physical server that we have just unpacked and set on the workbench in the data center.
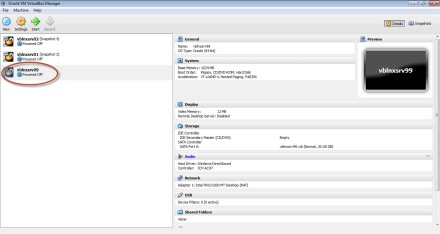
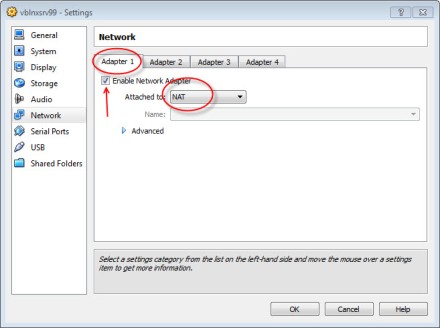
Now let’s open the network configuration for this machine. Click on the “Network” link in the configuration area:
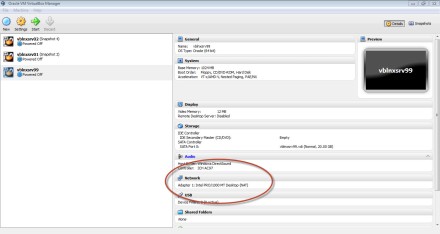
By default, Adapter 1 will already be enabled and configured for NAT. We can leave that one alone.
Configure eth0 as default NAT
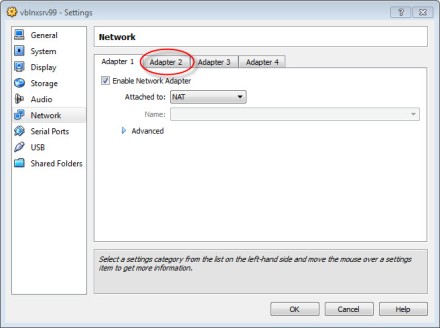
Now we need to add a second Network Interface Card (NIC) to this virtual machine.
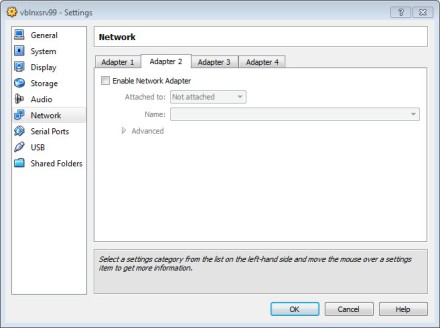
Click on the “Adapter 2” tab to bring up the configuration for this second NIC:
And we get this:
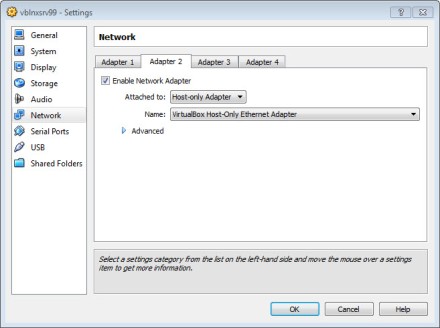
Check the “Enable Network Adapter” box, and select “Host-only adapter” from the drop-down list. The “Name” will automatically be filled.
Click “OK” and your machine is ready to have an operating system installed.

Configuring the Guest Operating System

We now have a virtual machine prepared with the NICs we will need to properly configure the OS we are going to install. We can now treat this virtual server just as if it were a physical server in our data center, mounted in its rack and connected to the router.
I will show the OS configuration for Oracle Linux 5.7,  bypassing the details of the full installation and focusing only on the network configuration done during the installation process. Please understand that this is just a convenience during the OS installation. Just as on a physical machine you can add, remove, and reconfigure NIC’s and other networking configurations after the OS is installed and initially configured, these same operations could also be done after the fact on this vm.
When installing Oracle Linux, one has the choice of a ‘graphical’ or a ‘text’ installation. For reasons I won’t get into here, I choose the ‘text’ installation, so that is what you will see in the screen shots that follow.
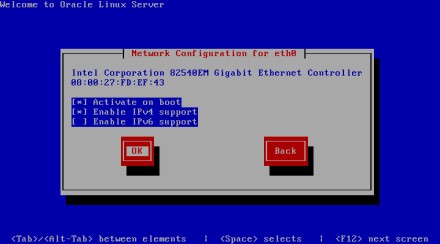
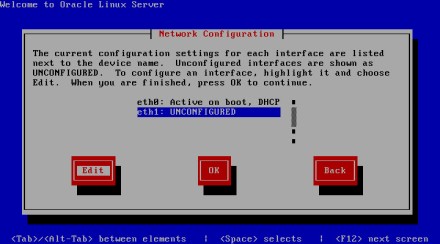
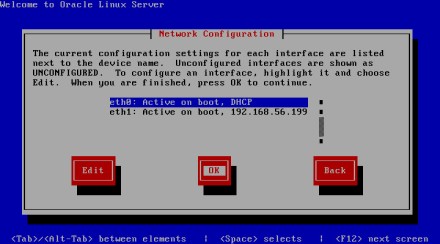
During the installation of Oracle Linux you will arrive at the “Network Configuration” dialog. At this point select adapter eth0 and “Edit”
Select “Activate on boot” and “Enable IPv4 Support”, then “OK”
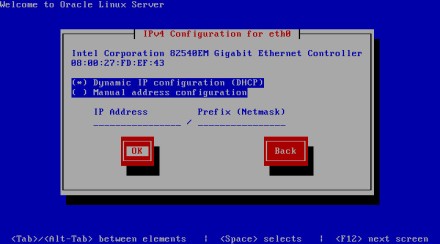
At the “IPv4 Configuration for eth0″ accept the default for DHCP configuration, and click “OK”
Back at Network Configuration, select adapter eth1 and “Edit”
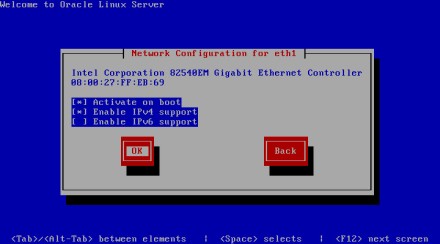
Again, select “Activate on Boot” and “Enable IPv4 Support”, and click “OK”
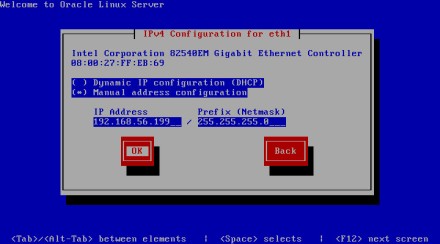
At the configuration of eth1, select “Manual Address Configuration” and assign a fixed IP address.
IMPORTANT: please note that the IP address assigned must be in the same subnet as the VirtualBox Host-Only ethernet adapter that we noted on the host os. In this example that adapter is at 192.168.56.1. For my own naming conventions, my virtual Linux servers will be in the range 192.168.56.101-199, and virtual Windows servers will be in the range 192.168.56.201-299. In both cases, the last two digits of the ip match the two-digits in the server name itself. Thus, the server created for this demo, which has a name of vblnxsrv99 will have an ip address of 192.168.56.199.
With both NICs configured to the OS, we click “OK”.
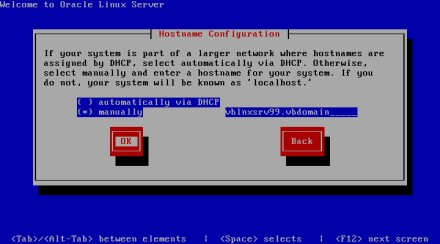
That brings up the “Hostname Configuration” screen. Here we assign the actual server name and a domain. It is important that we select to assign the address manually (NOT using DHCP).
At this point we select “OK” and continue with the rest of the installation.
Once the installation of the OS is complete, we can check the network configuration of the vm’s OS. At this point I can already start using my standard desktop tools to connect to the vm. I use putty as my ssh client to establish a connection, using the fixed IP we assigned the server. In this case that is 192.168.56.199
Once connected, let’s check the configuration with the ‘ifconfig’ command:
1
2
3
4
5
6
7
8
9
10
11
12
13
14
15
16
17
18
19
20
21
22
23
24
25
[root@vblnxsrv99 ~]# ifconfig
eth0 Link encap:Ethernet HWaddr 08:00:27:5C:8F:98
inet addr:10.0.2.15 Bcast:10.0.2.255 Mask:255.255.255.0
UP BROADCAST RUNNING MULTICAST MTU:1500 Metric:1
RX packets:4 errors:0 dropped:0 overruns:0 frame:0
TX packets:18 errors:0 dropped:0 overruns:0 carrier:0
collisions:0 txqueuelen:1000
RX bytes:1325 (1.2 KiB) TX bytes:3180 (3.1 KiB)
 
eth1 Link encap:Ethernet HWaddr 08:00:27:EC:0C:47
inet addr:192.168.56.199 Bcast:192.168.56.255 Mask:255.255.255.0
UP BROADCAST RUNNING MULTICAST MTU:1500 Metric:1
RX packets:882 errors:0 dropped:0 overruns:0 frame:0
TX packets:244 errors:0 dropped:0 overruns:0 carrier:0
collisions:0 txqueuelen:1000
RX bytes:100764 (98.4 KiB) TX bytes:33696 (32.9 KiB)
 
lo Link encap:Local Loopback
inet addr:127.0.0.1 Mask:255.0.0.0
UP LOOPBACK RUNNING MTU:16436 Metric:1
RX packets:8 errors:0 dropped:0 overruns:0 frame:0
TX packets:8 errors:0 dropped:0 overruns:0 carrier:0
collisions:0 txqueuelen:0
RX bytes:560 (560.0 b) TX bytes:560 (560.0 b)
[root@vblnxsrv99 ~]#
Remember that we configured eth0 to the NAT adapter and using DHCP. The ip address you see at line 3 is the DHCP assigned address of 10.0.2.15. While it is true that in this limited environment that will probably always be the address assigned, as a matter of practice you can never count on what address will be assigned by DHCP, so this is not the address we use to connect to the server. We have it only to support the NAT adapter so that we can reach the internet to download packages.
The NIC we are interested in is eth1, which we see at line 10, with the ip we assigned to it (192.168.56.199) shown at line 11.
We have one bit housekeeping left. For reasons I don’t understand, when Oracle Linux installation (5.x versions) creates the local hosts file /etc/hosts, it assigns the host name to the local loopback address. We can see this here:
1
2
3
4
5
6
[root@vblnxsrv99 ~]# cat /etc/hosts
# Do not remove the following line, or various programs
# that require network functionality will fail.
127.0.0.1  vblnxsrv99.vbdomain vblnxsrv99 localhost.localdomain localhost
::1  localhost6.localdomain6 localhost6
[root@vblnxsrv99 ~]#
We want to associate the server name with the fixed ip address we assigned, so modify the hosts file by adding a line for the fixed ip address, and reassigning the host name to that address:
1
2
3
4
5
6
# Do not remove the following line, or various programs
# that require network functionality will fail.
127.0.0.1  localhost.localdomain localhost
192.168.56.199  vblnxsrv99.vbdomain vblnxsrv99
::1  localhost6.localdomain6 localhost6
[root@vblnxsrv99 ~]#

Conclusion

And there you have it. A Linux machine running under VirtualBox with it’s networking configured to our specification. It can reach the internet for downloading of packages, which will be needed when you start to install the Oracle database. It is completely hidden from our corporate and public networks. And we can reach it from our desktop operating system using the very same tools as any server in our data center. If you get to this point, there is no reason you should not be able to treat this server just like any other server in terms of installing and configuring Oracle databases – or anything else for that matter.